Setting Up An Automated Home Media Server With Docker

With streaming services becoming more fragmented, getting access to all your favorite content has become almost as inconvenient and expensive as it was in the days of cable packages.
Even if you happen to find your favorite content on a streaming platform, there’s no guarantee it will be around forever. A single discontinued licensing contract could mean losing access to countless pieces of media!
For these reasons, I have built up a fairly large music collection on my hard drive. I recently realized I needed a proper backup solution for my music and other important files.
I figured while I was at it, I would make my music collection streamable, because there’s lots of stuff Spotify and others don’t have. Then I figured since I was hosting music, I might as well start building a collection of movies and television for when I inevitably tire of paying for Netflix and Hulu.
Here’s a breakdown of the server I built:
| Type | Item | Price |
|---|---|---|
| CPU | AMD Ryzen 3 2200G 3.5 GHz Quad-Core Processor | $79.89 @ OutletPC |
| Motherboard | Gigabyte B450M DS3H Micro ATX AM4 Motherboard | $73.99 @ Amazon |
| Memory | Corsair Vengeance LPX 8 GB (1 x 8 GB) DDR4-2400 Memory | $39.99 @ Amazon |
| Storage | Toshiba X300 8 TB 3.5" 7200RPM Internal Hard Drive | $167.99 @ Amazon |
| Case | Deepcool TESSERACT BF ATX Mid Tower Case | $49.99 @ B&H |
| Power Supply | Silverstone 300 W 80+ Bronze Certified SFX Power Supply | $61.99 @ Amazon |
| Prices include shipping, taxes, rebates, and discounts | ||
| Total | $473.84 | |
| Generated by PCPartPicker 2019-08-13 13:51 EDT-0400 |
I went cheap for this build, because all it needs to do is reliably store media files. I gave it a decent CPU and 8GB of memory so streaming this media to a couple clients should be no problem.
Software Stack⌗
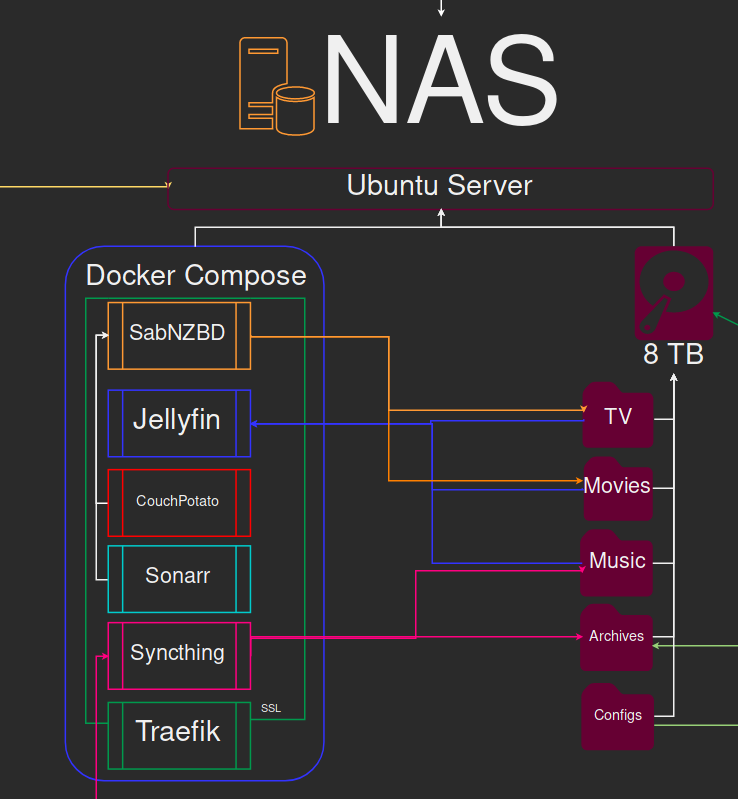
This diagram should give an overview of how our software talks to each other. Basically;
- All programs are run in docker for portability and convenience
- Sonarr watches usenet for TV shows I want
- Couchpotato watches usenet for movies I want
- SABnzbd downloads the NZBs found by Sonarr and Couchpotato
- Jellyfin serves these media files with a pretty interface
- Traefik generates SSL certs for the desired containers
Step 1: Setting up Docker⌗
In this tutorial I will assume you are a docker novice. If you already have some familiarity with docker, you can probably skip to the next section.
Since I am running my machine with Ubuntu Server, I am going to install the necessary packages with the following command:
sudo apt install docker.io docker-compose
docker is a program that runs applications in containers. These containers share the kernelspace with the host machine, but isolate their own dependencies and runtime environments. This is great for application security and portability.
docker-compose is a functionality within docker that allows a series of containers to be preconfigured, so they can all be launched, maintained, and updated easily and conveniently.
I set up my “programs” folder with a docker-compose.yaml file, along with subfolders for every application to store configurations and metadata.
Step 2: Setting up Traefik⌗
Traefik is a reverse proxy that integrates with Let’sEncrypt to dynamically provide SSL certificates to running applications. It will be able to securely direct HTTP requests to our server to the correct container.
If you aren’t planning on using these services outside your home network, it’s safe to skip this step. If you own a domain and wish to access your media anywhere, read on.
Traefik needs two files to work correctly. The Traefik configuration file, traefik.toml, and the configuration defining the container behaivior in docker-compose.yaml. Let’s take a look at that first.
version: '3'

services:
   reverse-proxy:
      image: traefik:latest
      restart: always
      container_name: traefik
      ports:
         - 80:80
         - 443:443
         - 8081:8081
      expose:
         - 8080
      networks:
         - traefik
      environment:
         - DO_AUTH_TOKEN=<or another DNS provider if you use one>
      volumes:
         - /var/run/docker.sock:/var/run/docker.sock
         - ./Traefik/traefik.toml:/traefik.toml
         - ./Traefik/acme.json:/acme.json
      labels:
         - "traefik.backend=traefik"
         - "traefik.docker.network=traefik"
         - "traefik.enable=false"
         - "traefik.frontend.rule=Host:Host:monitor.mydomain.com"
         - "traefik.port=8080"
         - "traefik.frontend.headers.forceSTSHeader=true"
         - "traefik.frontend.headers.STSSeconds=315360000"
         - "traefik.frontend.headers.STSIncludeSubdomains=true"
         - "traefik.frontend.headers.STSPreload=true"
Some things to take away:
- We need to bind ports
80and443to receive HTTP/S traffic. These ports must be forwarded to your server from your router. - We mount our docker node to the traefik container so it can see our other containers
- We mount
traefik.tomlandacme.json, the file used to store our SSL configurations. traefik.enableis set to false because I don’t need to use it outside my network.
Then we have to define some more settings in traefik.toml
defaultEntryPoints = ["http", "https"]
logLevel = "DEBUG"

[entryPoints]
  [entryPoints.dashboard]
    address = ":8081"  # I changed from 8080 because SAB uses it
  [entryPoints.http]
    address = ":80"
      [entryPoints.http.redirect]
        entryPoint = "https"
  [entryPoints.https]
    address = ":443"
      [entryPoints.https.tls]

[api]
entrypoint="dashboard"

[acme]
   email = "me@mydomain.com"
   storage = "acme.json"
   onHostRule = true
   entryPoint = "https"

   [acme.dnsChallenge]
      provider = "digitalocean"
      delayBeforeCheck = 0

   [[acme.domains]]
      main = "*.mydomain.com"

[docker]
domain = "mydomain.com"
watch = true
network = "traefik"
- The entrypoints section forces HTTPS and enables the dashboard on
locahlhost:8081. - The
acmesection defines the settings for Let’sEncrypt, which may need to be tweaked for your setup.
The above file must be created:
touch acme.json && chmod 600 acme.json
To test out what we have so far, go to the root of your docker directory and run docker-compose up. Traefik was the hardest for me to configure, so read the output carefully for errors. If everything went OK, we should see our dashboard at localhost:8081.
Step 3: Docker Configurations⌗
The other applications in this setup are mostly controlled through web interfaces. That means that after the container is up and running, you can change the settings via your web browser just how you like them.
I will go over the basic steps to get things running, but after that it’s up to you!
Here is the full docker compose file for my current setup
version: '3'
services:
   reverse-proxy:
      image: traefik:latest
      restart: always
      container_name: traefik
      ports:
         - 80:80
         - 443:443
         - 8081:8081
      expose:
         - 8080
      networks:
         - traefik
      environment:
         - DO_AUTH_TOKEN=
      volumes:
         - /var/run/docker.sock:/var/run/docker.sock
         - ./Traefik/traefik.toml:/traefik.toml
         - ./Traefik/acme.json:/acme.json
      labels:
         - "traefik.backend=traefik"
         - "traefik.docker.network=traefik"
         - "traefik.enable=false"
         - "traefik.frontend.rule=Host:Host:monitor.gideonwolfe.com"
         - "traefik.port=8080"
         - "traefik.frontend.headers.forceSTSHeader=true"
         - "traefik.frontend.headers.STSSeconds=315360000"
         - "traefik.frontend.headers.STSIncludeSubdomains=true"
         - "traefik.frontend.headers.STSPreload=true"

   jellyfin:
      image: linuxserver/jellyfin
      container_name: jellyfin
      environment:
         - PUID=1000
         - PGID=1000
         - TZ=America/Los_Angeles
      volumes:
         - /home/gideon/Data/Programs/Docker/Jellyfin/ProgramData/:/config
         - /home/gideon/Data/Media/TV/:/data/tvshows
         - /home/gideon/Data/Media/Movies/:/data/movies
         - /home/gideon/Data/Music/:/data/music
      ports:
         - 8096:8096
      labels:
         - "traefik.enable=true"
         - "traefik.port=8096"
         - "traefik.frontend.rule=Host:server.gideonwolfe.com"
         - "traefik.backend=JellyFin"
         - "traefik.frontend.entryPoints=https"
         - "traefik.frontend.headers.forceSTSHeader=true"
         - "traefik.frontend.headers.STSSeconds=315360000"
         - "traefik.frontend.headers.STSIncludeSubdomains=true"
         - "traefik.frontend.headers.STSPreload=true"
         - "traefik.docker.network=traefik"
      networks:
         - traefik
      restart: unless-stopped


   couchpotato:
      image: linuxserver/couchpotato
      container_name: couchpotato
      environment:
         - PUID=1000
         - PGID=1000
         - TZ=America/Los_Angeles
         - UMASK_SET=022
      volumes:
         - /home/gideon/Data/Programs/Docker/CouchPotato/config:/config
         - /home/gideon/Data/Programs/Docker/CouchPotato/Downloads:/downloads
         - /home/gideon/Data/Media/Movies:/movies # Where movies end up
      ports:
         - 5050:5050
      restart: unless-stopped
      labels:
         - "traefik.enable=false"

   sabnzbd:
      image: linuxserver/sabnzbd
      container_name: sabnzbd
      environment:
         - PUID=1000
         - PGID=1000
         - TZ=America/Los_Angeles
      volumes:
         - /home/gideon/Data/Programs/Docker/Sabnzbd/config:/config
         - /home/gideon/Data/Media/:/downloads
      ports:
         - 8080:8080
         - 9090:9090
      restart: unless-stopped
      labels:
         - "traefik.enable=false"

   sonarr:
      image: linuxserver/sonarr
      container_name: sonarr
      environment:
         - PUID=1000
         - PGID=1000
         - TZ=America/Los_Angeles
         - UMASK_SET=022 #optional
      volumes:
         - /home/gideon/Data/Programs/Docker/Sonarr/config:/config
         - /home/gideon/Data/Media/TV:/tv # Final folder where shows end up
         - /home/gideon/Data/Media/:/downloads # Same as SAB downloads
      ports:
         - 8989:8989
      restart: unless-stopped
      labels:
         - "traefik.enable=false"
networks:
  traefik:
    external: true
  internal:
- Each
servicelevel represents a containerized docker application. - The
imagelevel tells docker where to pull the image from. - The
environmentlevel allows you to pass variables into the container. - The
volumeslevel mounts directories from the host into docker containers. This allows for persistant settings and access to media locations. portsdefines the port to access the serviceslabelsallow us to define additional settings, such as disabling SSL certs with traefik.
I would recommend creating a seperate docker-compose.yaml for each sevice, and testing them ony by one before combining them into a master compose file.
Step 4: Web configuration⌗
-
Jellyfin:
localhost:8096- As long as your desired media is mounted in
docker-compose.yaml, You can use the dashboard page to set up libraries with these folders. Piece of cake.
- As long as your desired media is mounted in
-
SABnzbd:
localhost:8080- You need to connect SAB with a usenet provider using your account credentials and API key sent by your provider. This is done in the “Servers” settings tab.
- Set up the Categories tab to sort downloads into appropriate folders. For example, tv goes to
./TV, movies to./Movies. These puts them in the folders Jellyfin looks in.
-
Sonarr:
localhost:8989- Allow Sonarr to rename episodes under ‘Media Management’
- Under the “Indexers” tab, enter the url and API key from any indexers you have accounts for. Sign up for as many as possible for maximum success finding media.
- Under “Download Client” tab, add SAB. You will need the local IP address of your SAB server as well as the API key found in the “General” section of the SAB settings.
- Optionally enable metadata fetching
-
CouchPotato:
localhost:5050- Add your indexers in the “Searchers” tab
- Add SAB in the “Downloaders” tab
- Allow Movie Renaming
After all this is set up, we should be able to test it with some media.
- Try finding a single TV episode through Sonarr using the magnifying glass.
- This should be sent to SABnzbd to download
- It should be in your media directory
TV/Series/Season #/Episode - Refresh Jellyfin and view the media
Once this pipeline is working correctly, add all the shows you want, and set up monitors so new episodes are automatically downloaded.
For CouchPotato, try adding a movie and seeing if the same behavior happens. Are your movies showing up in Jellyfin?
Conclusion⌗
In this guide, I detailed the steps for setting up an end to end automated pipeline for downloading and streaming your favorite media. Although the initial setup can be tricky at times, the portability and convenience offered by docker makes this setup awesome!
Containers and services can easily be added to the configuration, such as Syncthing or Nextcloud for file backups and sharing.